Data Engineering Foundations: A Practical Introduction to Snowflake, Fivetran, and dbt
Replicating a CSV dataset: Import a CSV file into Snowflake using Fivetran, then create a basic dbt model to clean and select essential columns

Photo by Dollar Gill on Unsplash
Welcome to our exciting journey through the world of data integration and transformation! Today, we're diving into a practical project that involves a trio of modern data tools: Snowflake, Fivetran, and dbt. Whether you're a data enthusiast, a professional looking to sharpen your skills, or just curious about how data moves and transforms in the cloud, you're in for a treat!
Engineering Your Data Path
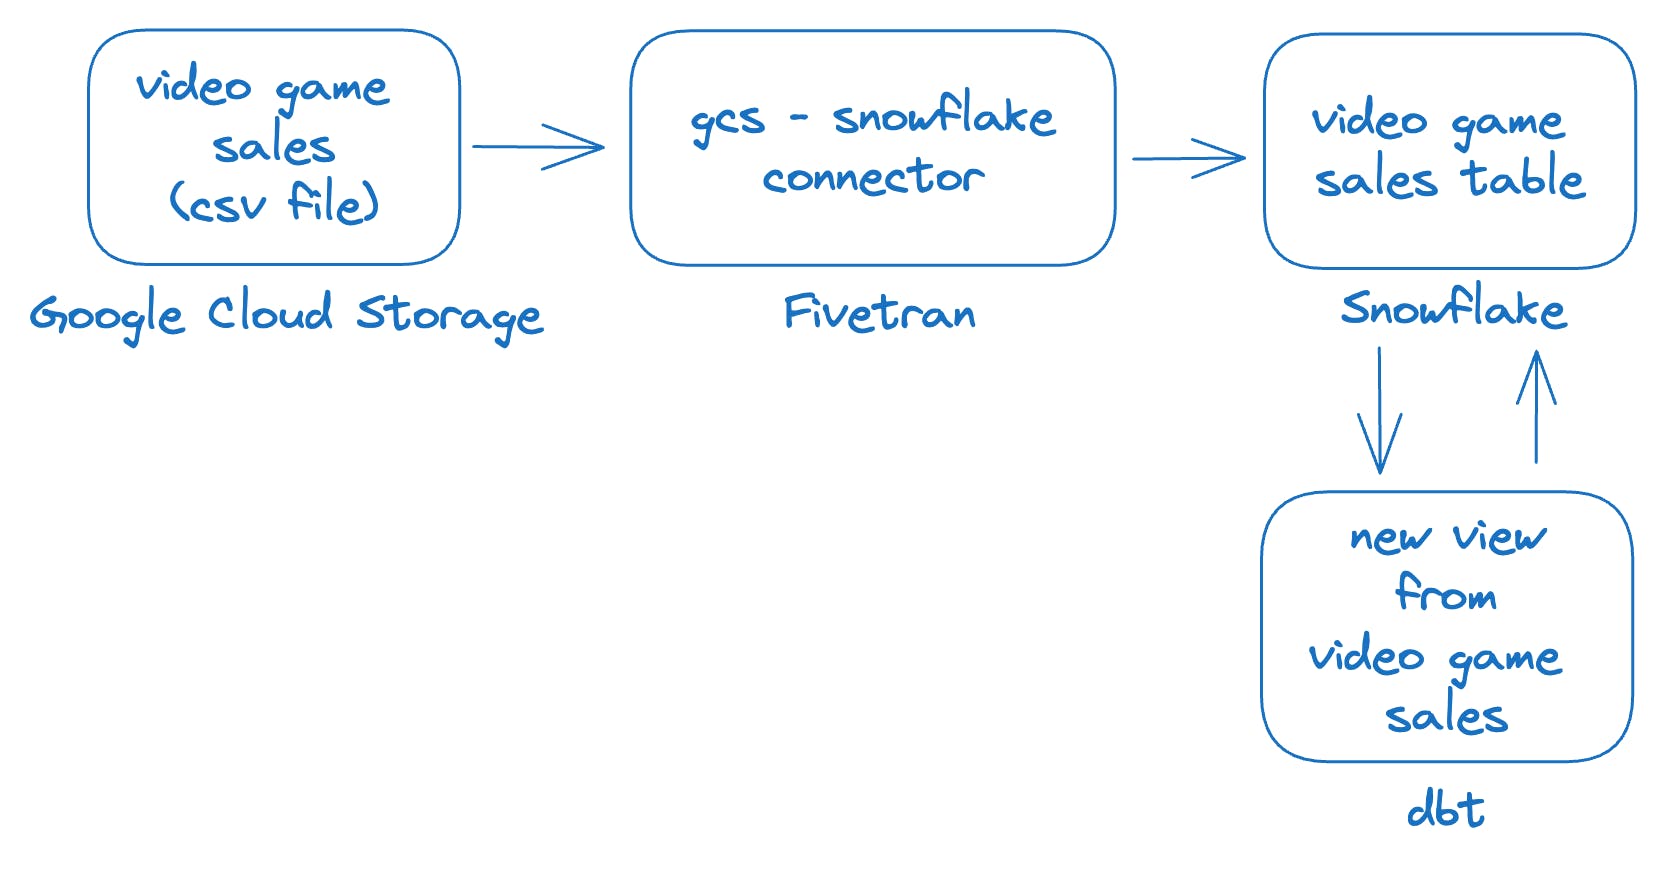
Embark on a practical and enlightening journey through the landscape of data engineering with Snowflake, Fivetran, and dbt. This blog serves as your roadmap, detailing each step to transform raw data into insightful information.

Here's what we'll cover:
Setting Up Your Workspace: Begin by securing a trial account with Snowflake.
Acquiring the Data: Dive into Kaggle to fetch the Video Game Sales dataset, your key to hands-on learning, and prepare it for its cloud journey by loading it into a Google Cloud Storage (GCS) bucket.
Integrating with Fivetran: Create your Fivetran account and connect it with your GCS bucket.
Connecting the Dots with Snowflake: With Fivetran as your conduit, establish a link to Snowflake, setting up the database and configuring access within Fivetran to facilitate data synchronization.
Synchronizing Your Data: Initiate the sync process, transferring the Video Game Sales data from your GCS bucket directly into Snowflake.
Preparing for Transformation with dbt: Install the dbt-Snowflake adapter on your computer, laying the groundwork for data modeling and transformation.
Launching Your dbt Project: Create a simple dbt project tailored to the Video Game Sales database in Snowflake.
Executing Your Transformation: Run the dbt sync to materialize your new view in Snowflake, witnessing the culmination of your efforts as your data is transformed and ready for exploration.
1. Setting Up Your Workspace
Diving into the world of cloud data warehousing has never been easier, especially with Snowflake's offer of a trial account that allows you to test-drive its impressive features without spending a dime.
Access the Snowflake Signup Page:
- Go to the Snowflake trial signup page: https://signup.snowflake.com/
Complete the Signup Form:
Basic Information: Provide your first name, last name, email address, company name, and phone number.
Account Setup: Create a username and choose your preferred cloud provider (AWS, Azure, or GCP) and region.
Edition: Select the 'Enterprise Edition' for your trial.
Agree to Terms: Review and agree to Snowflake's terms of service.
Click "Continue":
Activate Your Account:
- You'll receive an email from Snowflake with an activation link. Click on the link to confirm your email and activate your trial account.
Create Username and Password:
- Set up a secure username and password to access your Snowflake account.
2. Acquiring the Data
To acquire the data necessary for your analysis, you'll need to download the "Video Game Sales" dataset from Kaggle.
Download Dataset
This dataset is available in CSV format and can be obtained by visiting the following link: Video Game Sales Dataset on Kaggle.(direct download link: Video Game Sales Dataset)
Upload the file to Google Cloud Storage Bucket
create a bucket (this blog will assume that the name of the buckets is:
my-video-game-salesupload the csv file downloaded from Kaggle into the bucket.
3. Integrating with Fivetran
Fivetran simplifies data synchronization, offering a plug-and-play solution that requires minimal configuration. To start, visit Fivetran's website and sign up for a trial.
Access the Fivetran Signup Page:
- Visit the Fivetran signup page: https://fivetran.com/signup
Complete the form with your details or signup with Google
Verify your email address by clicking the link sent to your inbox.
4. Connecting the Dots with Snowflake
We've just embarked on a spectacular journey, setting up a pipeline from the ground of Google Cloud Storage all the way to the lofty heights of Snowflake, with Fivetran as our trusty guide. It's a tale of connecting dots, a dance of data, where each step is meticulously choreographed to ensure the smooth flow of information.
Configure Snowflake "Destination" in Fivetran
Sign in to Fivetran.
Click "Add Destination".
Name: Enter "my_snowflake"
Destination Type: Select "Snowflake"
Host: Enter your Snowflake host URL in the format
your-account.snowflakecomputing.com(find this in your Snowflake welcome email or profile).Password: Choose a strong password and record it securely.
Configure Snowflake
Log in to your Snowflake account.
Open a new SQL worksheet.
Run the script from: https://gist.github.com/nikhil-thomas/bf278c14438770d900fab087e6358e1d) , ensuring the password variable matches the one in Fivetran (set above).
In Fivetran, click "Save & Test".
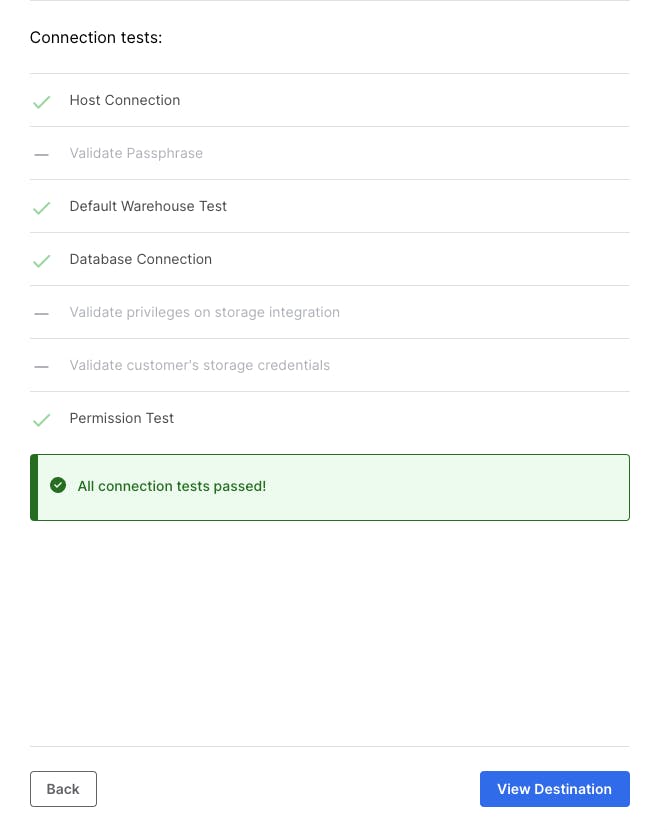
Wait for verification checks to pass, then click "View Destination".

Configure Fivetran "Connector" (to GCS bucket)
Click "Connectors".
Click "Add Connector".
Destination: Select "my_snowflake" (created earlier).
Data Source: Select "Google Cloud Storage" and click "Setup".
Destination Schema: Enter "my_fivetran_schema".
Destination Table: Enter "my_video_game_sales".
GCS Bucket Name: Enter "my-video-game-sales".
Note the Fivetran email address: (e.g., 'g-gradation-scalping@fivetran-production.iam.gserviceaccount.com')
Note: Look for text starting with
Share your Google Cloud Storage bucket with this email addressConfigure Permissions (GCS):
Go to the Google Cloud Storage console.
Click on your bucket "my-video-game-sales".
Click "Permissions".
Click "Grant Access".
Paste the Fivetran email address.
Select "Storage Object Viewer" role.
Click "Save".
In Fivetran, click "Save & Test".
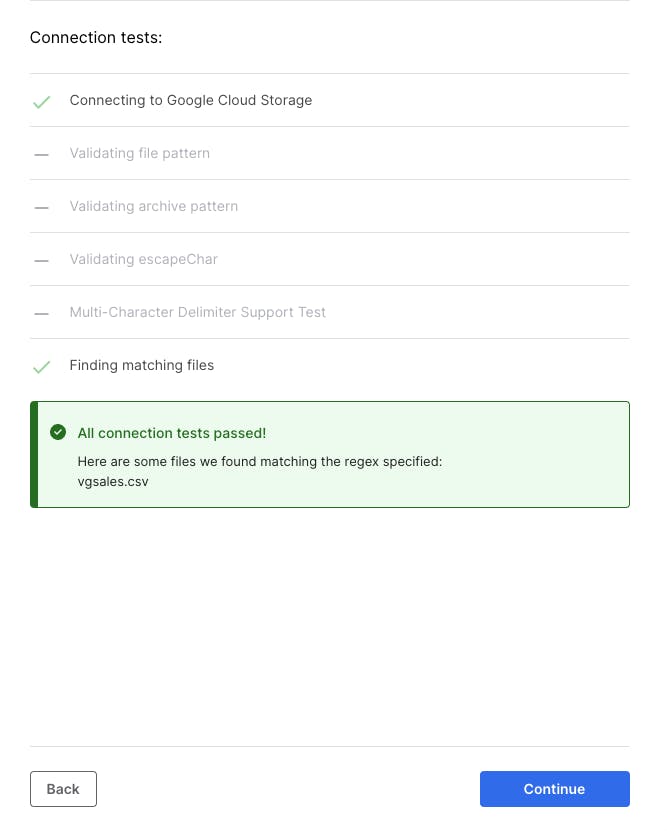
Wait for verification checks to pass, then click "Continue".

5. Synchronizing Your Data
Initiate Data Sync:
Within Fivetran, navigate to the "Connectors" section.
Select the newly configured connector.
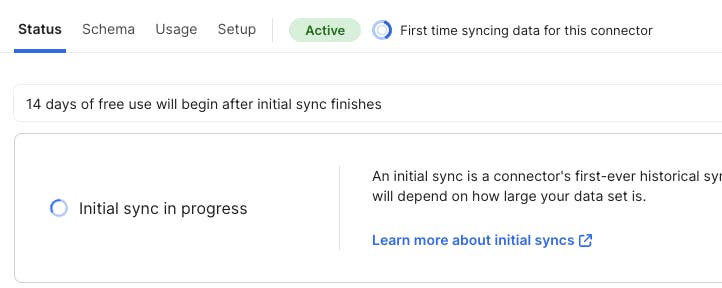
Click "Start Initial Sync" to begin the data transfer process.


Verify Data in Snowflake
Open a new SQL worksheet in your Snowflake environment.
Perform the following queries to check your transferred data:
Query 1:
  SELECT *
  FROM FIVETRAN_DATABASE.MY_FIVETRAN_SCHEMA.MY_VIDEO_GAME_SALES
  LIMIT 10;
Expected Output:
  RANK    NAME                PLATFORM    YEAR        GENRE
  1        Wii Sports            Wii            2006        Sports
  2        Super Mario Bros.    NES            1985        Platform
  3        Mario Kart Wii        Wii            2008        Racing
  ...
Query 2:
  SELECT count(*)
  FROM FIVETRAN_DATABASE.MY_FIVETRAN_SCHEMA.MY_VIDEO_GAME_SALES;
Expected Output:
  COUNT(*)
  16598
6. Preparing for Transformation with dbt
This is where dbt, our Data Build Tool, comes into play. Think of dbt as a sculptor, skilled at transforming raw blocks of data into meaningful insights. We'll set up a dbt project, connecting it to Snowflake, and prepare to mold our data.
Before using dbt with Snowflake, you need to install the correct adapter:
Open a terminal or command prompt.
Execute the following command:
python -m pip install dbt-snowflake(https://docs.getdbt.com/docs/core/pip-install#installing-the-adapter)
7. Launching Your dbt Project
Initializing Your dbt Project
Open a terminal
Create a dbt Project: Utilize the
dbt initcommand to setup a new directory specifically for your dbt project.Execute the command:
dbt init videogamesalesThis command kick-starts the creation of your new dbt project named "videogamesales."
Configure Snowflake Details: After executing the
dbt initcommand, you'll be prompted to enter your Snowflake credentials.dbt init videogamesales 07:58:36 Running with dbt=1.5.10 Which database would you like to use? [1] snowflake (Don't see the one you want? https://docs.getdbt.com/docs/available-adapters) Enter a number: 1 account (https://<this_value>.snowflakecomputing.com): <your snowflake account identifier> user (dev username): <your username> [1] password [2] keypair [3] sso Desired authentication type option (enter a number): 1 password (dev password): <your snowflake account password> role (dev role): role (dev role): role (dev role): accountadmin warehouse (warehouse name): FIVETRAN_WAREHOUSE database (default database that dbt will build objects in): FIVETRAN_DATABASE schema (default schema that dbt will build objects in): MY_FIVETRAN_SCHEMA threads (1 or more) [1]: ... Your new dbt project "videogamesales" was created! ...
Create Your First dbt Model
Navigate to the
modelsfolder within your dbt project.Create a new SQL file named
videogames_clean.sql.Add the following SQL code to the
videogames_clean.sqlfile:SELECT RANK, NAME, PLATFORM, YEAR, GENRE, PUBLISHER, GLOBAL_SALES FROM FIVETRAN_DATABASE.MY_FIVETRAN_SCHEMA.MY_VIDEO_GAME_SALESNote: This simple dbt model selects the core columns from your raw videogame sales data.
8. Executing Your Transformation
1. Run the Model
Open your terminal and navigate to your project directory (
videogamesales).Execute the following command:
dbt runThis will trigger dbt to process your model, run the SQL code against your Snowflake database, and generate a new table storing the transformed results.
  dbt run                                                                                                                                                            1 ↵
  08:43:31  Running with dbt=1.5.10
  08:43:31  Registered adapter: snowflake=1.5.6
  08:43:31  Found 3 models, 4 tests, 0 snapshots, 0 analyses, 325 macros, 0 operations, 0 seed files, 0 sources, 0 exposures, 0 metrics, 0 groups
  08:43:31
  08:43:33  Concurrency: 1 threads (target='dev')
  08:43:33
  08:43:33  1 of 3 START sql table model MY_FIVETRAN_SCHEMA.my_first_dbt_model ............. [RUN]
  08:43:33  1 of 3 OK created sql table model MY_FIVETRAN_SCHEMA.my_first_dbt_model ........ [SUCCESS 1 in 0.86s]
  08:43:33  2 of 3 START sql view model MY_FIVETRAN_SCHEMA.videogames_clean ................ [RUN]
  08:43:34  2 of 3 OK created sql view model MY_FIVETRAN_SCHEMA.videogames_clean ........... [SUCCESS 1 in 0.45s]
  08:43:34  3 of 3 START sql view model MY_FIVETRAN_SCHEMA.my_second_dbt_model ............. [RUN]
  08:43:34  3 of 3 OK created sql view model MY_FIVETRAN_SCHEMA.my_second_dbt_model ........ [SUCCESS 1 in 0.47s]
  08:43:34
  08:43:34  Finished running 1 table model, 2 view models in 0 hours 0 minutes and 3.13 seconds (3.13s).
  08:43:34
  08:43:34  Completed successfully
  08:43:34
  08:43:34  Done. PASS=3 WARN=0 ERROR=0 SKIP=0 TOTAL=3
Verify Data in Snowflake
Access your Snowflake environment and open a new SQL worksheet.
Run the following queries to validate your transformation:
Query 1: View the newly created view
  SELECT *
  FROM FIVETRAN_DATABASE.MY_FIVETRAN_SCHEMA.VIDEOGAMES_CLEAN;
Expected output:
  RANK    NAME                        PLATFORM    YEAR    GENRE            PUBLISHER    GLOBAL_SALES
  1        Wii Sports                    Wii            2006    Sports            Nintendo    82.74
  2        Super Mario Bros.            NES            1985    Platform        Nintendo    40.24
  3        Mario Kart Wii                Wii            2008    Racing            Nintendo    35.82
  4        Wii Sports Resort            Wii            2009    Sports            Nintendo    33
  5        Pokemon Red/Pokemon Blue    GB            1996    Role-Playing    Nintendo    31.37
Query 2: Check the original table
  SELECT *
  FROM FIVETRAN_DATABASE.MY_FIVETRAN_SCHEMA.MY_VIDEO_GAME_SALES
  ORDER BY GLOBAL_SALES DESC
  LIMIT 5;
Expected output:
  _FILE            _LINE    _MODIFIED                        _FIVETRAN_SYNCED                RANK    NAME                        PLATFORM    YEAR    GENRE            PUBLISHER    NA_SALES    EU_SALES    JP_SALES    OTHER_SALES    GLOBAL_SALES
  vgsales.csv        0        2024-03-11 17:23:33.679 +0000    2024-03-11 18:58:32.888 +0000    1        Wii Sports                    Wii            2006    Sports            Nintendo    41.49        29.02        3.77        8.46        82.74
  vgsales.csv        1        2024-03-11 17:23:33.679 +0000    2024-03-11 18:58:32.893 +0000    2        Super Mario Bros.            NES            1985    Platform        Nintendo    29.08        3.58        6.81        0.77        40.24
  vgsales.csv        2        2024-03-11 17:23:33.679 +0000    2024-03-11 18:58:32.894 +0000    3        Mario Kart Wii                Wii            2008    Racing            Nintendo    15.85        12.88        3.79        3.31        35.82
  vgsales.csv        3        2024-03-11 17:23:33.679 +0000    2024-03-11 18:58:32.894 +0000    4        Wii Sports Resort            Wii            2009    Sports            Nintendo    15.75        11.01        3.28        2.96        33
  vgsales.csv        4        2024-03-11 17:23:33.679 +0000    2024-03-11 18:58:32.894 +0000    5        Pokemon Red/Pokemon Blue    GB            1996    Role-Playing    Nintendo    11.27        8.89        10.22        1            31.37
Journey Recap
In this blog, we embarked on a transformative data engineering expedition. We established our foundation with Snowflake, pulled in raw data from Kaggle through Google Cloud Storage, and streamlined the flow using Fivetran. Finally, dbt gracefully stepped in to model and transform our data, leaving us with analytics-ready insights within Snowflake.
This hands-on journey demonstrates the remarkable synergy between Snowflake, Fivetran, and dbt. You're now equipped to:
Workspace Establishment: You started by provisioning a Snowflake trial account, setting up the foundation for your project.
Data Source: You sourced the Video Game Sales dataset from Kaggle and moved it to Google Cloud Storage, readying it for the cloud.
Fivetran Integration: You seamlessly connected your GCS bucket with Fivetran for automated data ingestion.
Snowflake Connection: You linked Fivetran to Snowflake, enabling data flow into your cloud data warehouse.
Data Synchronization: You successfully synchronized your video game sales data from GCS to Snowflake.
dbt Foundations: You installed the dbt-Snowflake adapter and created a basic dbt project to begin your data transformation journey.
Data Transformation: You executed your dbt sync, witnessing the transformation of your data and the creation of a new analytics-ready view in Snowflake.
And That's a Wrap!
This exploration through the realms of data integration and transformation demonstrates the power and synergy of using Fivetran, Snowflake, and dbt in unison. Each tool played a pivotal role in morphing raw data into a refined asset ready for analysis. For data enthusiasts, professionals, or anyone curious about data's journey from raw to refined, this guide serves as a testament to the capabilities of modern data tools in extracting meaningful stories from numbers and figures.
Embarking on this journey not only equips you with the knowledge of using these tools but also instills a deeper appreciation for the art and science of data transformation. As you venture forward, remember that each step, from data preparation to transformation, is a building block in crafting your data narrative, empowering you to uncover insights that can inform decisions, spark innovation, and illuminate the hidden narratives within your data.